

That Time I Tripped on Acid
- jeff2604
- Apr 12, 2025
- 10 min read
Updated: May 4, 2025
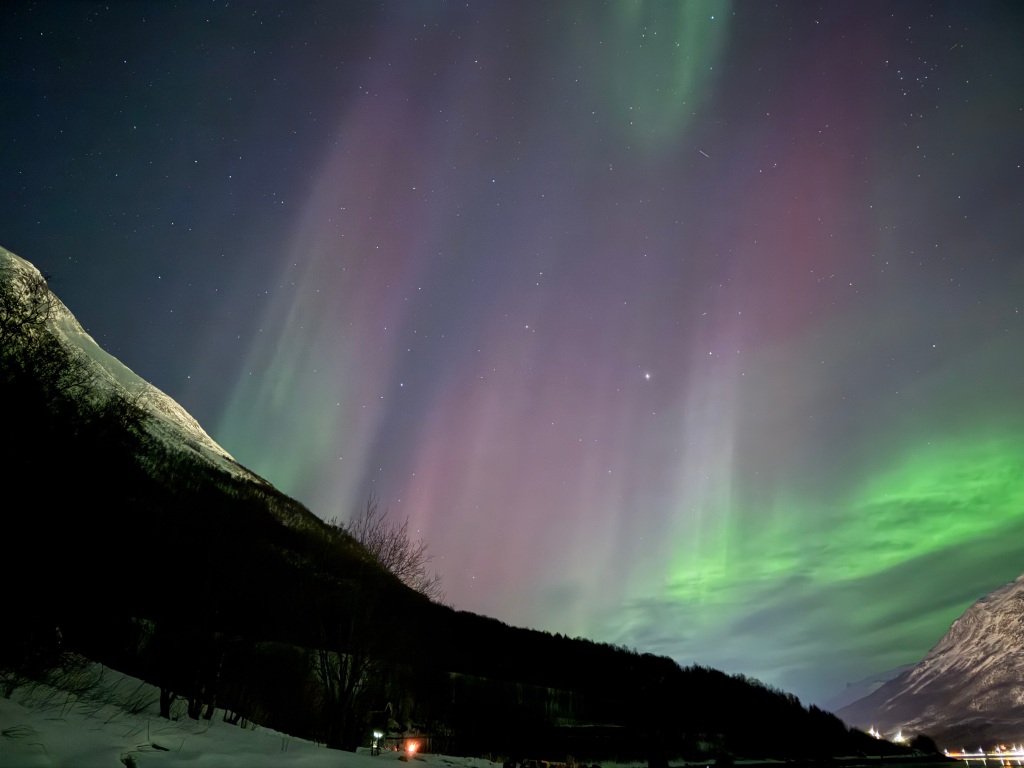
I was looking up at the sky when this kaleidoscope of colors rained down on me. The apocalypse had arrived, but I wasn’t afraid…I was mesmerized by it. A distorted version of the Beatles song “Lucy in the Sky with Diamonds” briefly ran through my head. Only instead of seeing plasticine porters with looking glass ties, I was seeing snow covered mountains that exploded in vibrant, pulsating ribbons of green, red, and purple. Now I know what the artist formerly known as Prince meant by Purple Rain…I saw the purple rain. I was sure I had been transported to another dimension.
OK, so I wasn’t really tripping on acid…never touched the stuff. It was the first time I witnessed the aurora borealis, the Northern Lights. I was fortunate to see the lights two days after the spring equinox and following a significant solar event, a time when the lights are more vivid, colorful, and swirly than usual. Yay me! If a hunt for the Northern Lights is in your future, I have some tips for you based on my experience. You can start by checking out the article I posted back in July of 2024 on improving your chances for a successful Northern Lights hunt, and then follow the following tips:
Tip 1: This is perhaps the most important tip of all because if you aren’t aware of what I’m about to tell you, it will ruin your Northern Lights experience. Here goes. The human eye doesn’t see the Northern Lights in color. Let me repeat that…you won’t see the Northern Lights in color when you look at them with your eyes. You’ll see them as white clouds, or sheets, ribbons, and swirls of white and shades of grey. I’ll skip the Biology 101 lesson on rod and cone cells…you’re welcome…and oversimplify it by saying the light energy from the Northern Lights is usually too weak for human eyes to detect the color in them. Here is a representation of what my eyes saw when I looked at the Northern Lights directly:
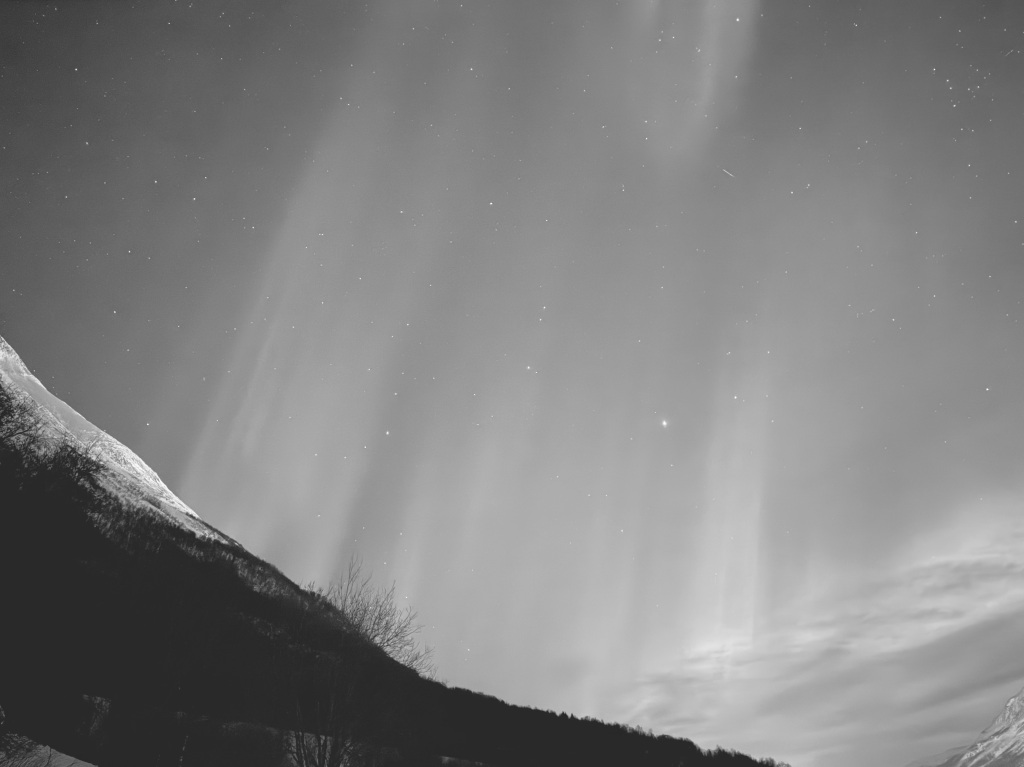
I generated this image by removing the color from a picture I took of the aurora that was in color, which is pretty much what happened when my eyes looked at the scene. The color was there, but my eyes couldn’t detect it, so all I saw was what you see above. It’s hard to get excited over that.
During particularly strong solar events, the Northern Lights can emit enough light energy for our eyes to pick up on the colors. There were a few times during the second night’s displays when I could see green colored auroras with my naked eyes, and they were magnificent. Most of the time though I saw them in black and white.
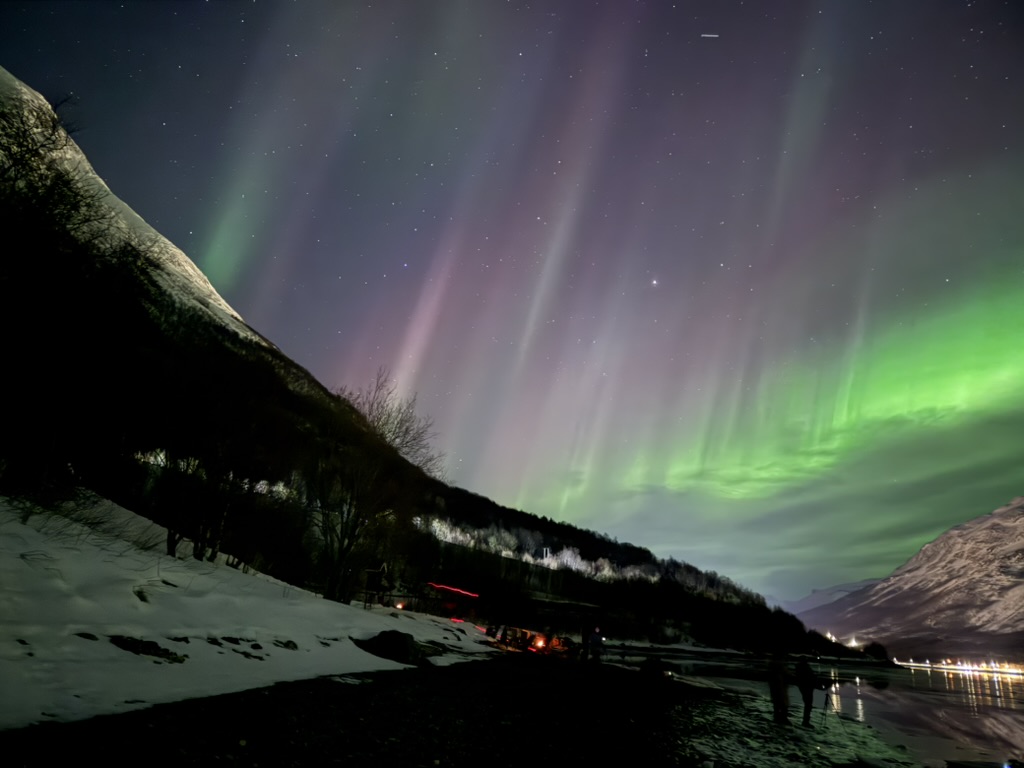
Tip 2: Look at the sky through your camera’s viewfinder or viewing screen to see the Northern Lights in color. Do you remember the scene in the movie The Wizard of Oz when Dorothy goes from dull, boring, black and white Kansas to the full color of Munchkinland? Munchkinland…talk about an acid trip. Anyway, that’s what happens when you go from looking at the Northern Lights directly with your eyes to looking at them through your cellphone’s camera app. You go from seeing the lights in black and white to seeing them in full, vivid color. From Kansas to Munchkinland. Here is what the image above looked like before I removed the color. I made no post-processing enhancements…what you see is what I saw through my camera:
Now that’s something to get excited about. It looked even better in real time on my cellphone’s viewing screen, because I could see motion. The vertically aligned pink and purple lights looked like sheets of rain falling on the mountainside, purple rain, and the horizontal green lights in the background swirled and pulsated like clouds from a summer thunderstorm. It looked ominous.
So why the difference between our eyes and a camera? Cameras, even cellphone cameras, are capable of detecting light with color at thresholds below human vision. Again at the risk of oversimplifying, in darkness human vision prioritizes motion detection over color accuracy as a survival trait. Ancient humans didn’t care what color the lion was, just that there was a lion in the grass stalking them at night. Cameras don’t have to worry about getting eaten by a lion. Unconstrained by biology and aided by the much faster pace of technological evolution, cameras optimize for both light capture and color fidelity.
Tip 3: Plan your hunt for a place that falls consistently under the auroral oval. That’s the band of Earth surrounding the magnetic North Pole where the aurora is present almost every night of the viewing season (late August through early April). For us that place was Tromso, Norway, but there are others…in northern Norway and Finland, and northern Alaska and Canada. And by northern, I mean north of the Arctic Circle or as close to it as you can get. Which is not Iceland.
During strong solar events the auroral oval expands to cover areas further south, like Iceland. And during extreme solar events auroral oval coverage expands as far south as the middle of the United States. Strong and extreme events are uncommon and unpredictable. They tend to be clustered around a solar max, like the one we experienced last year. We won’t experience another solar max until around 2035, so if you want to have the best chance of seeing the Northern Lights before then, you’ll have to go to the auroral oval rather than waiting for it to come to you. I highly recommend Tromso.
Tip 4: Book your Northern Lights hunt with a reputable tour operator, and make sure they use local drivers and guides, as well as a network of local cloud spotters to supplement the weather forecast. When you go on a Northern Lights hunt in a place under the auroral oval, like Tromso, the lights are going to be there most nights during the viewing season. But just because they’re present doesn’t mean you’ll see them. The “hunt” is all about finding cloud free skies, and you can forget about getting help from The Weather Channel. You’ll need the skill and knowledge of a local Northern Lights guide.
The Northern Lights occur in our atmosphere at altitudes of between 100km-400km, sometimes a little lower and sometimes a little higher but always well above the altitude clouds hang out. Which means if there are clouds, you won’t see the Northen Lights. Simple rule of thumb…if you can’t see stars because of cloud cover, you won’t see the Northern Lights. Not because they aren’t there, but because they are obscured by clouds. There’s bad news and good news in that. First the bad news. Most places under the auroral oval experience frequent cloud cover. The good news is that some of the areas, like Tromso, have numerous microclimates that offer cloud-free zones when the rest of the area is cloud covered. The challenge is that those cloud free zones move around from one night to the next, and even within the same night. So as with any good hunt, the best way to achieve success is to hire a competent local guide.
Tip 5: Use a tour operator that puts the safety of their clients above all else. Most Northern Lights hunts last 6-8 hours. You’ll spend 2-5 hours of that time driving over snow- and ice-covered back roads hunting for clear skies, occasionally driving through light to moderate precipitation, usually of the frozen variety. I didn’t pay attention to this caution when I booked our first Northern Lights hunt. The driver was not from Tromso…he was from Romania, and he drove like it. I know what that looks like because I’ve been driven around in Romania by a Romanian driver. It was just as scary there as it was in Tromso. We did not feel safe during the drive to and from our Northern Lights viewing area, and it was a 2 ½ hour journey each way. And the guide, also from Romania, proved the adage that even a blind squirrel finds a nut occasionally. We found clear skies, but it was in spite of him, not because of him.
Our second night of hunting was much better…we booked with Arctic Circle Tours Tromso. The driver Martina was a Tromso native who knew how to drive on the snow- and ice-covered back roads safely, and our guide Margaux knew the area well. Her knowledge made all the difference between seeing the lights against a plain, non-descript landscape and seeing them over the dramatic backdrop of a river slicing between majestic snow covered mountains as we did on our second night. The first night’s views were amazing because of the aurora. The second night’s were stunning because of the aurora and the surrounding scenery.
Tip 6: Use a tour company that looks after your comfort as well as your safety. The only comfort item the tour operator provided us on our first night of hunting were thermal suits. You’ll want that. We had a brief bathroom break at a gas station an hour into our drive out, but that was our only opportunity for a comfort break the entire night. And it was a 7-hour long hunt, emphasis on long. The tour description said we would be offered snacks and hot beverages, and we were…a package of store bought cookies and hot chocolate. With no bathroom at the viewing area and no possibility of a stop on the drive back to Tromso, not many people in our group took advantage of the hot chocolate. The spectacular auroral display was the only thing that made that first night out bearable, and because of the long drive, we only had two hours to enjoy it. It was worth every minute of discomfort to view the colorful show, but as we learned on our second night of hunting, viewing the Northern Lights, even in the Arctic, doesn’t have to be uncomfortable.
The second night of hunting for the Northern Lights was everything the first night was not. Our driver and guide made us about as comfortable as you can be outdoors in the Arctic. They offered thermal suits to any that wanted one, but then went way beyond that. They set up a viewing area in the snow next to a riverbank, complete with folding chairs and a small fire in a portable fire pit. They also set up a camp toilet with privacy tent and portable heater on the up-slope, and upwind, portion of the riverbank. Since we only drove 75 minutes to reach the viewing area our guide selected, we had about 3 1/2 hours to view the Northern Lights.
As exciting as the lights were, that’s a long time to be out in the windy, sub-freezing temperatures sitting and standing around in snow and ice. The chairs and plentiful hot coffee and hot chocolate were a welcome relief. With a tented camp toilet, nobody worried about drinking too much, and the heater in the toilet tent made going to the bathroom almost as popular as watching the Northern Lights. The fire was big enough to roast the hot dogs they offered us for dinner, but small enough not to affect our night vision. It also served nicely to cook up the Smores we made with the chocolate, marshmallows and graham crackers they brought, and for anyone not caring for Smores they brought donuts. It was not a gourmet dinner, but they didn’t promise one. It was a meal appropriate to the setting.
Tip 7: Stay away from tour operators that take you to a destination with a fixed viewing area and fixed restrooms. That might make for a more comfortable viewing experience, but it locks you into one or two areas for the night, regardless of what the cloud cover situation is over those places. And more often than not they will be cloud covered. On our first night of Northern Lights hunting we drove 2 ½ hours and reached almost to the border with Finland before we found clear skies. Other tour operators drove shorter distances to fixed facilities. Their clients were comfortable, but they didn’t see the Northern Lights because of cloud cover. We did.
Tip 8: Don’t expect much from the Northern Lights viewing areas. The best viewing areas are wide spots along a back road, barely wide enough for the van to pull off the road completely and with no other infrastructure in place. You’ll step off the van, potentially into knee-deep or deeper snow. You may have to walk a hundred feet or so to get a clear view of the entire sky from horizon to horizon, but it’s worth trudging through the snow to get that view.
The Northern Lights can show up in any direction, and from horizon to directly overhead. That’s one of the advantages of viewing them under the auroral oval. And if you have a really good driver and guide, you’ll be the only ones there, which we were. They go out of their way to find the hidden spots that offer dramatic scenery, while other guides are satisfied with following the crowds to larger parking lot types of viewing areas.
Tip 9: Select a tour operator that allows their driver and guide to call an audible. On our second night out, after 3 1/2 hours of viewing and photographing a Northern Lights display so amazing it elicited oohs and aahs even from our guide, it was time to head back. About 20 or so minutes into our drive back to Tromso, ribbons of green appeared on the spotting cameras pointing out of the van’s windshield. Our guide called an audible and directed us to another excellent viewing area she knew of close by. We ended up on a back road, more like an alley or farm road really, and pulled over at a spot with barely enough room on the unpaved shoulder for the van to park. What made the site special was that it was close to a wooden pedestrian bridge which made for a scenic setting for photographing the aurora display overhead.
We stopped at this second site for about 15 minutes, long enough to get some stunning pictures of the Northern Lights swirling above the snow and ice-covered bridge. The scene was nothing short of magical, and it took our guide’s knowledge of the area for us to get some of the most dramatic pictures of the night.
Tip 10: When you take pictures of the Northern Lights, use a tripod. I learned that lesson the hard way. I spent almost all of my time looking at the aurora on the viewing screen of my iPhone camera app. I took all my pictures of the Northern Lights with an iPhone 16 Max Pro. It took some great pictures, but all the Northern Lights pictures I took on our first night of viewing came out a bit fuzzy. I used night mode with an exposure of 10 seconds, and without a tripod. I couldn’t hold my phone still long enough to capture sharp images. On the second night of viewing the lights I used a tripod, and I got much sharper images.
Seeing the Northern Lights is something I’ve been wanting to do for almost my entire adult life. Having seen them, the experience was as “acid trippy” as I hoped it would be. If you want to see more of our Northern Lights pictures, check out the Norway and Northern Lights album on our Flickr page. If the Northern Lights are on your bucket list, give us a call…we can help you plan the most memorable and exciting Northern Lights hunt. There are no guarantees you’ll see them, but we can set you up to have the best chance possible.
Comments